Stephen Holmes looks at how to take the 3D print process in-house.
3D printing is fast becoming the most sought-after technology for model making in architectural practices across the world. Taking the technology in-house is exciting designers, allowing them to make scale models from 3D CAD data that can be used for design verification, customer presentations and public consultations. However, 3D printing is not as easy as simply hitting the print button. Invest in the wrong choice of machine, materials, or process and you could end up with a very costly mistake.
The basics
By now you have probably seen, or know, how the process works: layers of material, usually between 0.2 and 0.05mm, are built up on top of one another until a 3D model is built. Most models then need a certain amount of cleaning up and finishing to get the best results.
3D printers vary in size, model build volume and accuracy; the choice of machine and the material it can print in will impact on this. Buy a machine too large, and you have high running costs. A too small machine will be more affordable, but longer time will be required to create a full model in sections.
Size will also impact heavily on the amount you are going to be expected to pay. The current media hype around the technology revolves around the low-end, desktop printers that now cost around $1,000. Meanwhile, the top of the range machines can cost anywhere up to $500,000.
When comparing 3D printers you have to compare very different production technologies, so one of the best places to start is by deciding what you are going to use the models for.
For the design process
A small desktop machine, such as a MakerBot Replicator 2, is going to be useful for producing design iteration models that can be printed time and time again as the materials — in this case for a Fused Deposition Modelling (FDM) printer — are cheap and cheerful.
The step up from this is the likes of 3D Systems’ ProJet ZPrinter range that can produce fast full colour models that are great for during the design process.
ZPrinters use technology similar to an inkjet printer; selectively dropping a binding liquid onto a bed of powder, continuing this process in additive layers until the part is complete.
Changing the colour of the binding liquid allows for a full colour range to be printed directly. This gives it the ability to print models that can show CFD or FEA simulation data, texture information for realism or topological data for ground models.
Similarly full colour is the Mcor Iris, although its standout feature is that it uses A4 paper instead of any plastics. Build layers are glued together sheet paper cut with an accurate, digitally directed, mechanical scalpel. The colour data is printed onto the paper first before it is fed into the build section of the machine.
The ProJet ZPrinters and the Mcor are both a substantial investment.
3D Systems does not list a price for its professional machines, although expect them to start from around $15,000, with a top of the range ZPrinter to cost close to $100,000 once you have factored in the required extras, such as the clean-up booth, while the Iris costs around $47,000.
The MakerBot is $2,199, substantially less, but all these machines have cost benefits in that the materials are cheap to buy, they are fast to operate, and produce models ideal for the design process.
Making an impact
To make the right impression to a client the key is in the details, but higher definition machines are not necessarily for beginners.
Stratasys’ Dimension range are higher definition and higher speed FDM printers, offering bigger build envelopes than the desktop machines.

For truly high resolution and capturing every detail of a project you need to consider Stereolithography (SLA) machines. Using UV light to cure a photopolymer resin, the machines and their materials cost more, but the results are much sharper and detailed.
3D Systems’ ProJet range and Stratasys’ Objet Connex range are the leaders here, despite using slightly different technologies. Although the parts are not colour, they can always be finished and painted to whatever requirements you might have.
These are industrial machines, and come with industrial price tags, material costs, noise levels, heat output and electrical thirst. Chances are you will need to have a dedicated space for these machines, the materials and all the peripheral equipment.
Similarly you may need to factor in the cost of having someone to permanently take charge of running them: CAD models need checking, parts need cleaning, build trays swapping, materials levels monitoring.
A skill set for model assembly, artistic touches, and the necessary 3D printing know-how mean good model makers are much sought after. The round total for what the annual cost of investment of all this can be jaw dropping, but factored against what you might already be paying to outsource your model-making, the long-term benefits could be very worthwhile.
Beyond the machine
Once you have your machine there is much more to consider.
Whatever 3D CAD or BIM tool you use, your 3D model can be swiftly made ready for printing as an .STL or .OBJ file, but even then this needs to be verified. If the wall thicknesses are too thin when scaled down from 1:1 to 1:1000 then the model will fail. If printed as a solid block this could waste lots of precious and expensive materials.
Data preparation is often the biggest headache, and avoiding having to redesign a project simply for 3D printing a model is not workflow efficient.
Investing in a package such as Magics from Materialise can streamline the process immensely, and it works for all types of machines and processes. The software allows you to view slices, detect collisions, thicken walls and hollow out parts quickly.
It can generate costing reports, material use predictions and schedules for print runs, to help plan ahead. Once off the printer, cleanup can be as quick as snapping off support material with your bare hands, or as complex as pressure washing, applying coatings, or even hand painting.
Having the right space, equipment, knowledge and timescale is critical to getting this right.
Expansion
It is a fact that most large architects continue to have to use bureau services to meet demand for models.
Should you be trying to move your 3D printing in-house then take a close look at the printer’s expected demand. Once the service is readily available demand will go through the roof.
It might be that you already have a good relationship with a bureau service, and could use both this and an in-house machine.
Architectural practices that already have a 3D printing operation in-house might need more build capacity, and hence bigger or more machines.
A small desktop machine could also aid the verification process.
Whatever your situation, there is little doubt that the speed and results of 3D printing are changing the way the AEC design process works.
3D printing and augmented reality
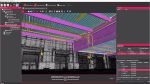
Creative production company Inition has developed a combination of 3D printing and augmented reality to add data to a static 3D printed model.
The London-based company printed a scale model of The Eli & Edythe Broad Art Museum in Michigan designed by Zaha Hadid Architects using supplied CAD data.

The production team developed an iPad app that used a marker surrounding the model to render the computer-generated overlays according to the angle of view. Several features were augmented onto the physical model, each proving a different concept.
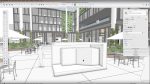
Dynamics were illustrated by a colourful simulated wind flow, which could be extended to water flow or fire simulations. How the building would be seen in the context of the local environment was explored with two other layers. One augmented an outside landscape designed environment so planners could judge the aesthetics of various outside natural features.
An onscreen slider changed the time of day so shadows cast by the proposed building could be determined as the sun moved across the sky.
Another widened the context by positioning the model into a Google map so architects could see its location in relation to local amenities and transport links.
What particularly excited Zaha Hadid was the services layer: Once activated, various internal parts of the building could be explored such as plumbing and planned rooms, something that would be complicated and time consuming to recreate with a physical model. inition.co.uk